Microsoft.CSharp
– supports compilation and dynamic code generation.
Microsoft.CodeAnalysis
– Roslyn platform.
– all-in-one package, includes Microsoft.CSharp above
– it also includes Microsoft.CodeAnalysis.Common Nuget package
– this package includes Microsoft.CodeAnalysis.dll
Microsoft.CodeAnalysis.Common
– A shared package used by the Microsoft .NET Compiler Platform (“Roslyn”).
– Do not install this package manually, it will be added as a prerequisite by other packages that require it.
OWIN – a specification whose goal is to decouple web frameworks from underlying servers. Through the use of an OWIN implementation we can remove the dependency on IIS and System.Web, meaning we can define our own middlewares.
Katana – an implementation of OWIN. From the figure below, Host.Iis and Host.SystemWeb are implementations of OWIN tying your app to IIS.
From Stackoverflow.
Controllers
Action results
All results derive from ActionResult.
Action Selectors
[HttpGet], [HttpPost]
Aliases: [ActionName(Name=””)]
Action Filters
Allow for cross-cutting concerns.
Global action filters (which apply to your entire application) are in your solution’s /Filters folder. Some of these are initiated in Global.asax.cs.
Create your own validation attribute by creating a class that inherits from System.ComponentModel.DataAnnotations.ValidationAttribute. You then apply the attribute to the property you want validated.
For a more in-depth validation of model object, you have to make the model class itself inherit from System.ComponentModel.DataAnnotations.IValidatableObject.
Routing
Not tied to MVC, it is part of ASP.NET.
What the routing system does is match URL segments to segment variables. E.g. map http://localhost/Home/Index/512 to segment variables defined in the route: {controller}, {action}, {id}.
Routing system then tries to map segment variables to controllers, actions and action parameters.
Define default values for routes.
Identity
An authentication and authorization mechanism
Attributes (can be used both on class and method level):
[Authorize]
[Authorize(Roles, Users)]
[AllowAnonymous]
Basic class structure:
Base assembly: Microsoft.AspNet.Identity.Core
UserManager – this is the one you yourself would in your apps directly. Acts as Application Layer, orchestrates various pieces of business logic pertaining to authentication and authorization: users, passwords, hashing, logins…
Various interfaces abstract operations needed by UserManager. We can ourselves provide the implementations or use ones provided out-of-the-box by the framework. E.g. Identity uses MS SQL by default, but you can implement IUserStore to store in a different persistence store.
From Scott Allen’s Pluralsight course on ASP.NET MVC 5 Fundamentals
Identity persistance is implemented using Microsoft.AspNet.Identity.EntityFramework. It is an implementation of abstractions defined above (in Microsoft.AspNet.Identity.Core).
From Scott Allen’s Pluralsight course on ASP.NET MVC 5 Fundamentals
Seeding the database with users:
Enable migrations using PMC command enable-migrations. This will also create a new file Configuration.cs. There is more on running these commands below under “Entity Framework 6” section.
Add a new piece of logic to this file. Also update the AutomaticMigrationsEnabled property to true.
Web API 2
Documentation pages
Help pages with basic API documentation are generated using Microsoft.AspNet.WebApi.HelpPage package.
To use method comments as documentation, you must do two things:
Under project properties build an XML documentation file. E.g. App_Data/PatientData.xml
To use that file, in HelpPageConfig.cs uncomment line config.SetDocumentationProvider(). Set appropriate path.
Return types are covered with IHttpActionResult
OkResult, NotFoundResult…
Provides a better formed interface as opposed to earlier HttpResponseMessage and allows for easier unit test set up.
Apply attribute to controllers or methods: [EnableCors(“*”, “*”, “GET”)]
Authenticated Web API
To login from browser client app via JavaScript, you must capture the access token. You login from browser client app via OWIN Middleware.
In App_Start/Startup.Auth.cs there is already configured TokenEndpointPath (it should be “/Token”) – OAuth Authorization server listens on this endpoint. You must provide it with user/pass and a key/value pair (&grant_type=password) – will get an access token in return.
You must then capture the token and send it with each request to the API. Send it as header (Authorization: Bearer <access_token_here>) to API.
Whether the access token is sent as Bearer token is determined by the API. Out-of-the-box Web API requires Bearer.
Database First – creates .tt files, allows for a visual designer.
Model First – allows for a visual designer.
Code First – class-to-database model.
Migrations
Migrations in EF6 allow for multiple contexts, however each context requires a separate folder for migration files and Configuration.cs.
Migration Steps (in a Code First scenario, taking into account the possibility of having multiple contexts in the same project):
PMC> enable-migrations -ContextTypeName NinjaContext -MigrationsDirectory Migrations\NinjaContext – this is a one time thing, ran once per context. Each run also creates a Configuration.cs in provided migrations folder.
Migrations wants to find the connection string. Migrations target both Startup project and the Target project (set up in PMC). Target project is the one where your context and repository are defined. Only Startup project is searched for connection string. Startup project is usually the web project with your connection string defined.
If you have multiple contexts all targeting the same database, you can have one connection string and make all the contexts use that one connection string. Simply rename the connection string and apply the same string to the base ctor of each context.
EF6 allows for multiple schemas in the same database. These are defined in the Fluent API. You can have each context targeting their own schema. Having multiple contexts facilitates DDD bounded contexts, which is then easily reflected in the database through separate schemas.
Configuration.cs
Tells you if:
Automatic migrations are in effect? Keep this false.
What is your migrations directory (optional)?
What is your database schema? If you want to move the schema, you should do that in .OnModelCreating(). Gist
Seed method, ran on every migration. Even if you do not have any migration to apply to the database, you can still run update-database to run Seed method.
Database initialization
When your app starts up, EF checks the state of the database and migration history. This is done by querying the database. You can (and should?) skip this in production. You can do this by issuing below code. I do not from where to call this (startup code, most likely).
Simplest implementation: in context class ctor, add: Database.Log = sql
=> Debug.Write(sql);
A more complex solution involves installing Glimpse logging framework from Nuget. We are talking about Glimpse.EF6 and Glimpse.MVC5 packages.
After installing Glimpse, you must enable it in your app by going to /glimpse.axd and selecting “Turn Glimpse On”. Now all of the pages in your app will have an informative toolbar at the bottom. Queries can be found under the SQL tab.
Glimpse
CRUD operations
.AddRange() stores multiple objects within the same transaction.
Behind the scenes, EF 6 will override the virtual property and implement the logic to load data on-the-fly.
When you first reference the property, EF goes to the backing store and fetches data.
Performance considerations
DbSet.AsNoTracking() – useful in disconnected scenarios, as EF does not need to track retrieved entities. Does not work with .Find(), so for readability you should use .Find(). For speed use .NoTracking().Where(predicate).
Design considerations
Having a foreign key vs. navigational property in a related entity in a disconnected scenario:
If we were to only have navigational properties in the related entity, that means every time we want to add the related entity to the parent entity, we need an instance of the parent entity. The only way to obtain the parent instance is via a trip to the database.
If we were to have the foreign key in the related entity, we could populate it directly from the HTTP request and store the entity via context to the database – save us one trip to the database per action.
EF can map scalar and collection properties with private setters.
EF can map properties with private setters.
EF cannot map fields.
Collections and EF:
EF can map to ICollection<>.
EF cannot map to IEnumerable<>. If you are implementing DDD you will have to decide whether you want to keep the collection public and simply trust yourself and your team not to manipulate elements directly. The alternative here is to create DTOs that map between database and the domain model (complex undertaking).
Many-to-many is easily recognized by EF. Keep in mind many-to-many is not recommended by DDD, there are a few articles on it over on DDD blog post.
IQueryable<> vs IEnumerable<>
IEnumerable<>:
Exposes query results.
Query is executed, results are stored in memory and returned to the caller for further processing and filtering.
You can filter within the repository, but this requires a new method for every filtering variation needed by clients.
Potential downside is with generic repositories: you cannot query from within the repository because the type is marked out and you are not aware of properties on the entity.
IQueryable<>:
Exposes the query, thus allowing you to further work with the query before executing it. Sounds good, but has critical downsides.
Breaks the encapsulation provided by your repository: first, you are now making all clients aware of the Entity Framework. Second, you are losing control over how business rules guide associations between entities because now any clients can filter and include additional entities.
To sum up, this approach is appropriate only for simplest domains.
Mocking
To mock DbSet<>, simply use a mocking framework.
.Add() – refer all calls to a List.Add().
.AsNoTracking() – a no-op, simply return the in-memory List.
.Include() – a no-op, simply return the in-memory List.
IQueryable() query methods – there are four properties you need to mock.
to make it work, set the project in which the classes are to Startup Project and right click on your DbContext. There should be an Entity Framework option.
Resource – anything that can be named (data and computing power): PNG, HTML, CSS, functionalities exposed by the web server.
Uniform Resource Identifier (URI) is an implementation of a resource identifier in the HTTP protocol. Best known form of URI is URL.
Representation – a sequence of bytes containing the serialized resource and additional metadata about the resource.
REST is:
An architectural style for distributed systems.
A set of constraints. If a system applies these constraints, it is considered to be RESTful.
REST constraints:
Client/server
REST can be applied only to distributed systems.
Stateless
HTTP is stateless, so is REST. Any statefulness comes from the web server/web framework maintaining state on HTTP requests, not from HTTP itself. If an application keeps state in Session object, it is not RESTful.
Cache
Cache stable data to improve network and processing performance.
Uniform interface – main distinguishing point between REST and other distributed architectures. Consists of several subconstraints:
Identification of resources via unique URIs.
Utilize HTTP methods on resources.
Manipulation of resources through representations – representation + metadata should be enough to modify or delete a resource. Use full representations to affect resources.
Self-descriptive messages: requests must contain everything necessary for the application to execute the desired operation (e.g. use HTTP Media types to describe content.
HATEOAS – drives how to consume and use the API. Allows for a self-documenting API. Each representation should contain URLs to additional related resources, to facilitate client navigation
Layered system:
To improve scalability and reduce dependencies in a large system, architect layered systems according to functions.
Some functionalities like caching, security and load balancing can be shared.
Code on demand – optional and least applied constraint.
API Design Guidelines
The hierarchical resources must be separated by a forward slash (/): api/categories/products
Nonhierarchical resources should be kept flat: api/employees
All words should be lowercase and use hyphens (-) to improve readability. For example, localhost/user-comments
No file extensions. Please note, we are designing URLs for a RESTful API, not for websites, so you won’t see the URLs end with .html/.aspx/.jsp/.php, etc.
Use a plural noun for collection names. For example, books
Use an identity for specific documents or elements, but keep plural noun to identify resource type: api/authors/{authorId}/books/
Query parameters should be used for filtering, sorting, ordering: api/authors?orderby={name}
Use a verb or verb phrase for controller names: books/search
Create/Read/Update/Delete (CRUD) operations should not be used in URLs. For example, you will never see the URL get-book/10, because the correct design is to send the URL books/10 within an HTTP GET request to the server, the HTTP request is a self-descriptive message.
API Design Exceptions
Sometimes there are certain actions on the model that cannot be easily mapped to the resource-style API: calculating the total number of pages an author wrote.
api/authors/{authorId}/pagetotals – fits API design guidelines, but is out of place
api/authorpagetotal/{authorId} – fits API design guidelines, but is out of place
api/authors/{authorId}/totalamountofpages – does not fit API design guidelines, but is practical and can be tolerated if a rare exception.
JSON APIs
Most REST APIs return JSON formatted resources. There are two relevant JSON formatts:
JSON API
HAL
Relevant HTTP Request Methods
GET – requests a representation of the specified resource. The server will retrieve the resource and send it back through a response. The GET request can be fired by clicking hyperlinks, entering a URL in the address bar of a browser, or an AJAX call. Because GET requests won’t change the resource on the server, and it doesn’t transfer representation, it doesn’t have a request body.
Return NotFound() or Ok(resource).
POST – requests that the server accepts the entity enclosed in the request body as a new subordinate of the web resource identified by the URI, which means there will be a new resource created on server. The POST request can be fired by an HTTP <form> element submission or an AJAX call. The POST request has a request body, and the representation needed by the server to create the new resource is enclosed in that request body.
The response has a 201 code, contains a Location header with newly created resource’s URI and a body with resource representation.
Return Created(location, resource).
If the provided resource is not valid, response code is 400.
Return BadRequest()
PUT – requests that the server replace the whole existing resource with the one enclosed in the request body. If the target resource doesn’t exist, then it will create a new one. Send the resource Id in URL. The PUT request can be fired by an AJAX call and has a request body.
The response has a 200 code, no Location and no resource representation.
Return Ok(), resource is optional.
If trying to replace a non-existing resource or the provided resource is not valid, response code is 400.
Return BadRequest()
DELETE – requests the server to delete the target resource identified by the URL. The DELETE request can be fired by an AJAX call. The DELETE request doesn’t have a request body.
The response has a 200 code.
If trying to delete a non-existing resource, response code is 404.
PATCH – requests the server to update the existing resource with the one enclosed in the request body. In most cases, if the representation in the request body is a complete resource entity, the PUT and PATCH are interchangeable. But if the representation only contains the changed properties of the resource entity, the PATCH and PUT are not interchangeable. The PATCH request can be fired by an AJAX call.
The response:
resource is optional
HTTP codes as return values
200 – Found the resource.
200 – Created a resource.
204 – No content – could not find the resource.
415 – When trying to get or delete a specific resource and the resource does not exist.
You can control which HTTP response code is sent back, just look up the name of the HTTP response code and you can call the same method on ControllerBase, spelled in camel casing: Ok(); NotFound();Created();BadRequest();Forbid();
Model binding
Model binding in ASP.NET Core maps data from HTTP requests to action method parameters.
Attributes on action parameters guide ASP.NET Core on how to bind from HTTP request’s URL, query or body:
[FromRoute]
[FromQuery]
[FromForm] – extract data from the posted <form>
[FromBody] – extract data from posted JSON/XML object in the HTTP request body.
Serialization
All processing results must be serialized into a string to be sent back via HTTP.
By default, ASP.NET Core serializes responses into JSON. This is because ASP.NET Core, by default, loads Microsoft.AspNetCore.Mvc.Formatters.Json.dll assembly and uses the class JsonOutputFormatter.
You explicitly request ASP.NET Core to serialize action’s return value into a JSON by calling:
return JSON(result);
If you want to return XML, update the code services.AddMvc() to services.AddMvc().AddXmlSerializerFormatters and when sending the HTTP request, add a header Accept: application/xml
Unit Testing
Functional test:
Used to test the controllers and actions directly. It won’t test the URL routes and model bindings.
End-to-End test:
Used to test the entire flow of application from start to finish.
Create a “Build and Release” definition (New Pipeline). Beware: you must be a member of Build Administrators group or some other group that has Edit Build Definition permission set to True. Ask project owner to make you the admin and you can add yourself as the member.
Choose a template.
Build from master.
Now you are at “Tasks” tab. This is a list of dotnet commands to be executed.
Change default name, make it descriptive: “PwHelloAzure-master-CI”.
Click “Build Process” on the left side.
Agent Queue: “Hosted VS2017”.
Somewhere in the cloud there is a machine with VS2017 being used to build our project.
We can also build on a private build agent, but this requires us installing some software on our machines.
“Get sources” is repository settings (already set at this point) and build tasks.
Each task might reference some variables. Variables are of the format $(variable_name), e.g. $(BuildConfiguration), $(build.artifactstagingdirectory).
You can define the variables in the next tab: “Variables” (some are already predefined, some are editable).
“Publish” task: look at the command. It outputs the result of build into the $(build.artifactstagingdirectory). Default directory name is “drop”.
“Publish Artifact” – publishes what is in $(build.artifactstagingdirectory). You can download and install this locally as well.
“Triggers” tab.
“Enable Continuous Integration”
Include master – when something is changed on master branch (push into or a pull request merge), start build.
Other options:
“Scheduled” – you can set a fixed time of day to trigger the build and release.
“Build completion” – start another build after this one has finished.
“Save and Queue” -> overview -> “Save and Queue”
View Builds
Menu: “Builds and Release” -> “Builds” -> hover over build -> ellipsis
Several options appear in the popup:
“View build results” – you can see build server console output as it is being built.
“Edit” – open build task details, you can reconfigure stuff here.
You can check each build and each step within the build.
“Logs” -> ellipsis -> “Download all logs”.
“Artifacts” -> “drop” allows you to download the built application.
Releases
brief overview: we must determine what it is we are releasing. Then we determine when we want to release. After that we define where we want to release.
Menu: Releases -> New Pipeline -> Azure App Service Deployments
Name it: “PwHelloAzure-CD”
Define an artifact. This is the built code you wish to deploy. Choose the build pipeline you defined earlier. It will also say what is the name of the last artifact built by that pipeline (default name: “drop”).
Once an artifact is defined, click on the lightning bolt next to the artifact: “Continuous deployment trigger”. Here you can define when you want to trigger the deployment. You can also deploy on a certain schedule.
Environments – here you define where you want to deploy: staging, QA, load testing, production.
To the left of the enviroment, click on to define Pre-deployment conditions. These are additional filters per environment, e.g. : only after a release, manually, deployment must be explicitly approved by someone, etc…
Tasks allow you to define concrete steps to be taken on deployment:
Task #1: Connect VSTS with Azure and define deploying to Azure. You need to be a member of Release management group to create a new Azure connection.
Run on Agent – allows you to define where the step will be run. This is the same as for builds: Hosted VS2017. Nothing to add here.
“Deploy Azure App Services” – define where exactly to deploy:
Deploy to slot: staging.
Leave rest at default.
Task #2: Slot swap. Find the task and add it to task list. Define it (options are intuitive).
Each organization can have multiple subscriptions.
Each subscription has a resource group associated with it.
Resources (such as a VM, App Service Plan, Web App) are within a resource group.
Billing is per subscription.
A VM has a number of resources started along with it (disks, CPUs, etc).
Think of Azure as a programmable data center, exposing its functionalities via REST API, accessible via Azure CLI.
Visual Studio and Azure
You can administer your Azure resources via Visual Studio.
View -> Cloud Explorer -> Account Management (top icon, looks like an outline of a person) -> Enter Azure/Microsoft login credentials
View -> Cloud Explorer -> <your subscription> -> <your resources>
View -> SQL Server Object Explorer
Visual Studio and VSTS
View -> Team Explorer -> Connect (green icon at the top) -> Choose your VSTS project.
Azure CLI
Exit az with “Ctrl+D”
# az login
# az account list
# az account set -s "account.name"
# az vm        // Work with VM: start, stop, deallocate, delete.
# az group     // Resource groups.
# az resource  // Particular resource.
# az account list-locations --query [].name    // query syntax.
                                               // Get only "name".
Virtual machine commands (can be used via GUI as well):
Stop – stops the machine, but resources are still reserved: CPU and memory are still being paid for.
Deallocate – stops the machine and deallocate it. CPU and memory are not being paid for. Machine is saved. Storage is still allocated and being paid for (however it is very cheap).
To clean up completely, you must delete the relevant resource group.
App Services
PaaS.
You have to determine the size of the underlying machine and OS. This is called an App Service Plan.
Pricing: per App Service Plan, not per App Service. In other words, you pay for a server, not per application running on it.
App Service Plan:
Each App Service is assigned to an App Service Plan. Multiple App Services can be assigned to one App Service Plan, meaning they will all run on that same App Service Plan.
We can scale an App Service Plan in two ways:
Up: Add additional resources (CPU, RAM, disks). This causes Azure to provision a new machine and migrate our code to them.
Out: Additional machines are started. This can be automated based on certain inputs.
App Service Plan is a resource. It must have a name. Try naming them with a suffix “plan“.
# az group create --location westeurope --name pwhelloazure
# az appservice plan create --resource-group pwhelloazure --sku S1 --name pwhelloazureplan
# az webapp create --resource-group pwhelloazure --plan pwhelloazureplan --name pwhelloazure
Deployment to Web App
Menu: App Service -> <your app service> -> Deployment credentials. Do this once for all deployments to Azure. Same for all subscriptions?
Menu: App Service -> <your_service> -> Deployment Option -> VSTS or Local Git Repository
Locally: git config user.email “foo”
Locally: git config user.name “bar”
Track remote.
Deployment slots
Menu: App Service -> <your app service> -> Deployment slots
A feature of App Services.
It is essentially a new App Service within App Service Plan. It is free, since you only pay for App Service Plan. The app in this slot is logically connected to your original app.
Each deployment slot has its own repository.
“development”, “staging”, “production”
The initial App Service you create is called “production”. Others are named by you.
When you push code to Azure, it is Project Kudu (more on that below) that is working behind the scenes to analyze your code, determine what kind of a project it is and sets everything up.
Monitoring
Menu: Monitor
You can look at metrics. Metrics differ based on which resource (App vs Plan) you are monitoring. Interesting metrics:
App Service (you monitor one particular application with this):
Requests in Application Queue
Requests
App Service Plan (you monitor the machine with this):
CPU Percentage
Memory Percentage
These two indicate your machine might be underpowered or is trying to host too many applications.
Alerts:
Base your alerts on metrics. Send emails once a threshold is reached.
Scaling
App Service can be scaled up and out.
Up – New machine with more resources. Essentially choosing a new App Service Plan.
Out – Additional new machines running new instances of your App Service.
Menu: App Service -> <your app service> -> Scale up/Scale out
Prefer scaling out over scaling up. Guidelines:
Stateless apps benefit from scaling out.
If clients must come back to the same machine, scale up.
Autoscale:
Define conditions under which new machines are provisioned.
Scale based on metric.
You can define rules when to scale out and when to scale in.
You can scale on certain dates or certain weekdays.
Debugging
Include diagnostic logs, telemetry and exception information.
Diagnostic logs:
Menu: App Service -> <your app service> -> Diagnostic logs
You can store logs in several places: App Service Plan’s filesystem (rather small), Blob storage, Azure storage account.
You can store application logs (the developer creates these in his app) and web server (generated by IIS: failed requests).
Application Insights:
Menu: Application Insights
Paid service. It is a monitoring tool.
E.g. it tracks all the exceptions and other failures. Go to the “Failure” option. There you can see how many failed requests there were, what were the response codes, exception types. For each exception type you can see more details. By clicking on the exception message, you can drill in further.
Project Kudu:
Menu: App Service -> <your app service> -> Advanced Tools -> Go
Takes you to the app’s domain with an .scm suffix.
When you push code to Azure, Project Kudu analyzes the project, determines runtimes and other details, generates a build and deployment script.
Some of the things you can do:
Download diagnostic logs.
Download the deployment script, tweak it, commit it and push it back into the Git repository. Project Kudu will detect that and use your script as the relevant one.
Open a CMD prompt. You also have access to the file system. Your app is under /site. There is a Git repo as well. You can edit files from Project Kudu’s site directly. CMD has git installed.
Remote debugging:
Menu: App Service -> <your app service> -> Application Settings -> Find and turn on Remote Debugging.
Then go to your Visual Studio -> View -> Cloud Explorer. Make sure to log in (little Person icon on top) and then you can find the Web App resource (you can also work with the file system, deployment slots etc… here). Right click on your App Service and Attach Debugger. You will have to turn off Just My Code.
Use it as a worst case scenario!
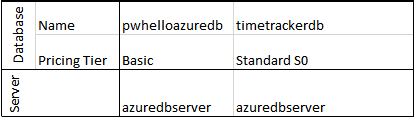
Databases – Azure SQL
Cloud version of MSSQL.
Menu: SQL Databases.
Pricing: you pay for a database. In other words, you can size each database differently and it will cost you differently.
Database vs. server:
Database in Azure is actually a logical container of data.
Server is simply a logical groupings of databases. It has nothing to do with how many resources you want to assign to each database.
Each database is sized separately. This means you can have multiple databases on same server, with each database having a separate pricing tier (separate DTUs, CPU, storage size).
To create a new database, you have to create a new server. Do not think because of the word “server” that you are creating an actual server. You have absolutely no control over the physical layout. Your databases could be scattered across multiple physical machines (Azure takes care of this). The name that you will assign to the server is what the external systems will use when connecting.
SQL Elastic Pools – useful if you are managing multiple Azure SQL instances and you want to share resources amongst them. It provides you with a cost-effective way of scaling your databases and handling spiky loads. E.g. one database is not experiencing a lot of traffic while another one is – Azure can reassign additional resources to the heavily used SQL server. Not useful if you have only one database.
Login data:
When you create a new server, you have to set up admin credentials (user/pass). It is not advisable to use these credentials to connect to database from your app, but rather create a database user.
You can do that by connecting via Visual Studio using admin credentials and then creating another database user.
DTU – size of the database is determined through database size and DTUs (Data Throughput Unit):
A relative measure of database power. It is a blend of CPU and I/O.
A database with 3.000 DTUs will be 300 times more powerful than a standard database with 10 DTUs.
Determining appropriate size:
Basic plan offers 5 DTUs – this is enough for development and testing, but does not perform well when you have concurrent users. There is little storage (2GB).
Standard plan offers more flexible choices and is suitable for production loads.
10 DTUs should be enough for a web site with 25.000 page views, where each view generates 1 or 2 database queries.
Allow access only to your App Service by choosing “Allow access to Azure services”.
Define specific IP addresses with access to your database. When connecting to Azure SQL via Visual Studio, you will be prompted to add an exception to the firewall based on your current IP address (double check this in the video!).
character – minimal unit of text with some meaning
character set – all characters across all languages
code point – a value in the character set. It is an ideal concept.
code unit – bit sequence used to represent each code point.
Unicode
A standard that tells us which character maps to which code point.
Code point
Each character maps to a certain code point. Each code point has an associated value.
It is an ideal concept. Code point values are not stored anywhere, they must first be encoded using character encoding of your choice.
Character encoding (UTF-8, UTF-16, UC-2, UC-4)
Transforms a code point to a specific binary value. This binary value has a certain format where certain bytes convey certain meaning, while other bytes are the payload.
When you want to read a document, your reader must be aware of its encoding, otherwise it cannot tell where one character ends and another begins.
UTF – variable length encoding system. Number (-8, -16) denotes minimum amount of bytes it takes up. It might take up more, depending on the code point you are encoding.
UC – fixed length encoding system. Number (-8, -16) denotes minimum amount of bytes it takes up. It applies zero-padding to reach its specified length.
Windows-1252
From what I could gather, Windows-1252 is considered a “character set”. What this means is that it does not entail a two-part scheme as Unicode and UTF-8, but rather it has its own character-to-binary mapping. It is somewhat compatible with ANSI.
Encoding UTF-8
We write the characters ‘špoi’ into the editor.
We tell the editor we are working with UTF-8.
Editor encodes the characters into UTF-8. What this means is the editor is able to find the letter ‘š’, ‘p’, ‘o’, ‘i’ and convert them to their hexadecimal values:
š
p
o
i
C5 A1
70
6F
69
We open the file again. The editor is not aware the text is encoded in UTF-8, but rather supposes Windows-1250. This time the editor searches the Windows-1250 character pages for hexadecimal values ‘C5’, ‘A1′, ’70’, ‘6F’, ’69’. We see the following, because the binary representation is the same, but the editor is interpreting it differently. Notice there are now 5 characters. This is because UTF-8 encoding for letter ‘š’ takes up 2 bytes (C5 and A1).
Ĺ
ˇ
p
o
i
C5
A1
70
6F
69
If we were to instruct the editor to view the data as UTF-8, we would see ‘špoi’.
ANSI-to-UTF8
So, let’s say we were writing something down in our favorite editor (you guessed it, ‘špoi’) and we save the file. Not knowingly, we saved it as ANSI. Later on, we open the file as UTF-8 and garbage comes out. This happened for the same reason as above: when you hit ‘Save’, your editor presumed (or defaulted) to ANSI: it went to check the ANSI character pages, found ‘š’ and encoded it as 9A (note: not C5A1 as that is UTF8 encoding).
What can we do to be able to read our documents once something like this happens? Well, we must convert the hexadecimal representation from ANSI to UTF8. If your editor is smart enough, it will be able to do this. This is what the hex values and the process looks like in Notepad++:
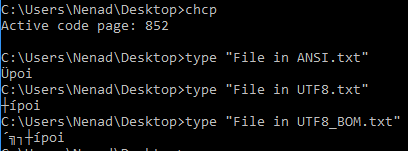
Demonstrate UTF8 and ANSI using cmd.exe and code pages
I have created three files using Notepad++, each with the same text written in it (‘špoi‘), but saved each with a different encoding.
Now, you might wonder why cmd.exe is not displaying ‘š’ when we didthe below action on an ANSI encoded file:
My cmd.exe is using 852 code page (see first command in above image). When we initially wrote ‘špoi’ in the editor, it was encoded in ANSI as 9A. Now, hex 9A is decimal 154, which is ‘Ü’ in code page 852.
Let’s try and make UTF8 encoded files work. We will change cmd.exe code page to something else, like UTF-8:
Yes, 65001 is UTF. All of a sudden, UTF8 encoded files make sense. Also note how the BOM is rendered as a whitespace.
However, we still have not been able to get cmd.exe to display ANSI-encoded ‘š’. The reason is we have not configured cmd.exe to display ANSI-encoded characters. Windows-1252 is ANSI encoding for the characters we are interested in, like ‘š’:
And finally, we can see the ANSI-encoded ‘š’.
BOM
We can instruct our editor to convert the file to UTF-8 with BOM. This results in 3 bytes prepended to the file. These bytes are not shown by editors (at least the smarter ones).
There is a way to see those hidden bytes, using cmd.exe. Let’s go again through the example above and check the third command output: it reads 8 bytes: first 3 are BOM, while the remaining 5 are the same as for UTF-8 encoded file.
Summary
When you create and save some text, you tell the editor how to encode it (ANSI, UTF8, UTF8 with BOM). The rest of the world most likely will not know what the hex values in the file or the stream mean. Most of the characters are the same across encodings (‘poi’ is encoded the same across encodings), but the special characters have different hex values across different encodings. When I say ‘rest of the world’, I mean other text editors and other applications (sometimes across the wire). Therefore, when communicating (either across applications or wire), both sides must be in agreement on how the characters are encoded, otherwise your ‘š’ might end up as ‘š’.
Microsoft.EntityFrameworkCore.Design package requires an executable project to work, that is the reason why it is referenced from Web/UI project. Make sure Web/UI project references Data and Domain projects. In your executable project (Web/UI), add package:
When you have a change in your C# model, run the commands in the terminal. It will create a timestamped file in Data/Migrations folder:
cd ./Data    // Navigate to the Data project
dotnet ef --startup-project ..\SamuraiApp.UI\ migrations add Initial
Check the SQL to be generated. You can use this script to deploy changes to production environments. Be aware if you apply the script for the initial migration that the database will not be created by the script (as opposed to the command in the next bulletpoint).
dotnet ef migrations script
Apply the changes. If there are multiple migrations that have not been applied yet, this command will apply them. Also worth noting: the first time you apply the migrations, this command will create the database itself. Contrast that with the script approach above.
dotnet ef --startup-project ..\SamuraiApp.UI\ database update
In case your database gets messed up and very out of sync with your model, you can delete it (use this in dev only!):
dotnet ef database drop --force
Save an Order, but do not save the Products (as they are already defined):
public void SaveOrder(Order order) {
    _context.AttachRange(order.Lines.Select(l => l.Product));
If you have multiple contexts, you will have to indicate which one you are referring to.
Two helpful commands rounding all of this up:
-- Create migration
cd ./AddressBook.Data; dotnet ef --startup-project ..\AddressBook.Web\  migrations add Initial --context AddressBookDbContext; cd ..

-- Execute migration
cd ./AddressBook.Data; dotnet ef --startup-project ..\AddressBook.Web\  database update --context AddressBookDbContext; cd ..
Identity
dotnet ef migrations add Initial --context AppIdentityDbContext
dotnet ef database update --context AppIdentityDbContext
when doing an Identity migration, make sure you DO NOT have seeding methods called from your Startup.cs!
Concepts
Basic Workflow
EF core query pipeline
Entity and Context
Two elements of EF Core Model.
Context allows EF Core to communicate with the data store.
Entity classes represent concepts within you domain.
Entities
A representation of a single table from the backing store.
An entity object is a representation of one row from the backing store.
Contain IDs (primary keys in the backing store), foreign keys and navigational properties (objects represented by the foreign keys).
Context
Inherits from Microsoft.EntityFrameworkCore.DbContext
Coordinates actions so they are performed within a single transaction against the database.
Represents a single session with the database.
Contains a number of DbSet<> properties, each of these representing an entity set (a table in the backing store).
Contains methods such as .OnModelCreating() . Such methods serve to further define the model. In other words, they help EF determine how the model is represented in the database (column sizes, indices, etc…) so it can generate better SQL. Using those methods results in a cleaner model (no attributes scattered throughout). I believe those methods constitute Fluent API.
EF Core names tables based on DbSet<> properties. You can singularize (and define a bunch of other table and column properties) with Fluent API, by overriding .OnModelCreating();
Dependent entity will get a foreign key on its PK. No need for the dependent entity to have the ID of primary entity, since its PK will also be the FK.
For a 1:0..1
protectedoverridevoidOnModelCreating(ModelBuilder modelBuilder){
// One-to-one relationship.
// Each student has one student image.
modelBuilder.Entity<Student>()
.HasOne(s => s.StudentImage)
.WithOne(si => si.Student)
.HasForeignKey<StudentImage>(s => s.StudentImageId); // ...
}
For a 1:1
protected overridevoidOnModelCreating(ModelBuilder modelBuilder) { // One-to-one relationship. // Each student has one student image. modelBuilder.Entity<Customer>() .HasOptional(c => c.ContactDetails) .WithRequired(cd => cd.Customer) // ... }
One-to-many:
relationships are discovered through naming conventions. If, for some reason, your names are off, you can use Data Annotations (not shown) and Fluent API (shown below).
class Grade { // Principal entity.
public int GradeId { get; set; } // Principal key.
public IEnumerable<Student>
Students { get; set; } // Collection navigation property.
}
class Student { // Dependent entity
public int StudentId { get; set; }
public int GradeId { get; set; } // Foreign key.
public Grade Grade { get; set; } // Reference navigation property.
}
// Student.Grade is an inverse navigation property of
// Grade.Students and vice-versa.
class MyContext : DbContext {
public DbSet<Student> Students { get; set; }
public DbSet<Grade> Grades { get; set; }
protectedoverridevoidOnModelCreating(ModelBuilder modelBuilder) {
// One-to-many relationship.
// Each grade is assigned to many students.
modelBuilder.Entity<Student>()
.HasOne(s => s.Grade) // Start with one.
.WithMany(g => g.Students); // Then define the inverse. }
}
Many-to-many
Require a mapping entity (EF Core 2 cannot map directly).
Requires an additional mapping in Fluent API, since EF Core cannot infer this relationship.
The mapping entity must have Ids for other two entities. Navigational properties are optional.
class Course {
public int CourseId { get; set; }
public IEnumerable<Enrollment>
Enrollments { get; set; }
}
class Enrollment {
public int CourseId { get; set; }
public Course Course { get; set; } // Optional
public int StudentId { get; set; }
public Student Student { get; set; } // Optional
}
class Student {
public int StudentId { get; set; }
public IEnumerable<Enrollment>
Enrollments { get; set; }
}
class MyContext : DbContext {
public DbSet<Student> Students { get; set; }
public DbSet<Grade> Grades { get; set; }
public DbSet<Enrollment> Enrollments { get; set; }
protectedoverridevoidOnModelCreating(ModelBuilder modelBuilder) {
// Many-to-many relationship.
// Each Course has many Students enrolled.
// Each Student is enrolled in many courses.
modelBuilder.Entity<Enrollment>()
.HasKey(e => new { e.CourseId, e.StudentId });
modelBuilder.Entity<Enrollment>()
.HasOne(e => e.Student)
.WithMany(s => s.Enrollments)
.HasForeignKey<Enrollment>(e => e.StudentId);
modelBuilder.Entity<Enrollment>()
.HasOne(e => e.Course)
.WithMany(c => c.Enrollments)
.HasForeignKey<Enrollment>(e => e.CourseId); }
}
Owned entities
DDD Value objects do not have identities. For them to be used by EF Core they have to be owned by an entity object. You can read more here.
entity.OwnsOne(a => a.TimeRange);
Notes:
When .OwnsOne()-ing an entity that has another entity that is owned, you will not be able to do it. You have to use .Add()/.Update()/.Delete()
Attaching (e.g. for an update) entities that own another entity will work only with EF Core 2.1
Querying
When you call Linq methods, you are simply building an internal representation of the future query. Only when you iterate will EF generate SQL.
var courses = context.Courses
.Include(course => course.Students).Include(course => course.Teacher).ToList();
.Include() always loads the entire set of objects. You cannot filter on .Include(). If you want to filter which related entities you are receiving, you can do that by executing two different queries on the same context instance, EF Core will fix the navigational properties. You can also do that by filtering on the related entity in the projection, but there are caveats:
it is clumsy since you either get anonymous type (unusable outside of the method), or you have to create a new type and return it from the method.
There is a bug in EF Core 2.0, where if you project into parent and related entity, the navigational properties do not get set.
Querying
DbSet.Find() allows querying by ID. EF internals know which property on the object is the ID. It will check for tracked objects in cache and serve those before going to the database. When using .NoTracking() you cannot use .Find(). Check on .NoTracking() in EF6 post. Beware that by using .Find() you also make the context track the newly instantiated object, which is a performance penalty in short-lived HTTP-request scoped contexts.
Please look at this gist for a basic and more advanced generic repository.
Several patterns allowing you to query either with or without .Find().
DbSet.SqlQuery(sqlText)
Parameters
If you hardcode a string into the Linq expressions, EF Core/database provider will also hardcode this string into the resulting query.
If you use a variable in the Linq expression, EF Core/database provider will parameterize the value.
// Hardcoded into the resulting SQL.
var samurais = _context.Samurais.FirstOrDefault(s => s.Name == "Sampson");
// Parameterized in the resulting SQL.
string name = "Sampson";
var samurais = _context.Samurais.FirstOrDefault(s => s.Name == name);
LastOrDefault
LastOrDefault requires the result set to first be ordered. If you omit ordering (as below), data provider will retrieve ALL records into memory and select the last record. This is very wasteful, so ALWAYS make sure to include an ordering method.
EF and SQL
You can also use string interpolation and DbParameter type.
context.Courses
.FromSql("SELECT * FROM dbo.Courses").ToList();
Eager loading
Entities, along with navigation properties, are loaded when the entire query is executed.
If you end the query with a .Select()creating an anonymous type for projection, .Include()will not work.
Some entities are loaded into memory earlier (in a separate query) and are tracked, while other navigation properties are loaded later on in a new query. Requires the use of Context.Entry(object). To explicitly load, you must have access to the context. Contrast this with EF 6 lazy loading, where you only need to reference the property.
Will result in multiple queries (two in the example below):
var ninja = context.Ninjas.Find(9);
// ... Eventually you require EquipmentOwned.
context.Entry(ninja).Collection(n => n.EquipmentOwned).Load();
Lazy loading
Does not work in EF Core 2. Does work in EF 6 (check blog post).
You can implement it yourself. Beware! Extremely expensive!
var filmId =4;var film = MoviesContext.Instance.Films.Single(f => f.FilmId == filmId);
Console.WriteLine($"{film.FilmId} - {film.Title}");
MoviesContext.Instance.Entry(film).Collection(f => f.FilmActor).Load();foreach(var filmActor in film.FilmActor){
MoviesContext.Instance.Entry(filmActor).Reference(fa => fa.Actor).Load();
Console.WriteLine($"\tfilm id: {filmActor.FilmId} actor id: {filmActor.ActorId}");
Console.WriteLine($"\t\tactor id: {filmActor.Actor.ActorId} - {filmActor.Actor.FirstName} {filmActor.Actor.
Name}");}
Insert (single and batch)
You can insert a single entity or in batch. Database provider will create adequate SQL statement(s).
Batch insert is done by doing a .AddRange(). Batch insert means a single DbCommand will execute multiple SQL statements:
Inserting related (!) data in a disconnected scenario is most easily done by setting the foreign key ID on the related entity. Check method AddChildToExistingObjectWhileNotTracked().
Update (single and batch)
You can update a single entity or in batch.
Batch update means a single DbCommand will execute multiple SQL statements:
var samurais = _context.Samurais.ToList();
samurais.ForEach(s => s.Name += "San");
_context.SaveChanges();
When updating a relatedentity in a disconnected scenario, you must be aware of some things:
If you simply do a Context.SomeRelatedEntity.Update(relatedEntity) it will result in DbContext marking the entire object graph as updated. This is because the related entity has a navigational property back to the parent entity, which in turn again has a navigational property back to the related entity. So even though you only gave the related entity to the context using .Update(), context will scan the object graph and determine that everything in its reach is up for update.
We can see this behaviour ourselves by placing a breakpoint right on Context.SomeRelatedEntity.Update(relatedEntity) and checking the DbContext (figure below – see how the count goes up to 3 even though we have updated only a single object). Please note this does not work on EF 6 – more on this in the dedicated blog entry.
The above problem is solveable by using Context.Entry(relatedEntity).State. See the section on .Entry() in this article.
Delete
When deleting an object, DbContext must first track it. In essence, this means you need to have a reference to the object you wish to delete and then hand that reference to DbContext.
If you have only have ID of the object you want to delete, you will have to first fetch the object in order to pass it back to the DbContext for deletion. Not practical, but that is way things are. As an alternative, you can use a stored procedure that does the deletion.
Batch delete is done using .RemoveRange().
Batch operations
Examples of batch operations for respective operations (insert, update, delete) have been given above.
Whether a batch command is really issued, depends on how many entities are inserted. Currently at least 4 entities must be inserted for it to be executed as a batch command.
Multiple database operations
If you combine multiple operations (insert, update, delete) on same context and then call .SaveChanges(), it will be bundled into one command.
Tracking
Every time you fetch something, DbContext starts tracking it. DbContext knows what you have changed and when you issue .SaveChanges() it only updates afflicted properties. However, this is true only for the connected scenario. In the disconnected scenario you must tell DbContext what is the state of certain objects in the object graph. To do that you must use methods described below.
When an entity is loaded, context starts tracking it. Context tracks several things:
reference to the entity
original values
new values
entity state
Check on .NoTracking() in EF6 post.
In disconnected scenarios, tracking is tricky since context does not know what happened to entities in the meantime. You can follow the State Object pattern by Julie Lerman. Apply the IStateObject interface only to the classes that need it, no need to apply on every class in the domain. Also make sure the context ignores State property when persisting.
DbSet<TEntity>.Attach()– start tracking in Unchanged state. Traverses the object graph for other untracked objects and if it finds an untracked entity whose identifier has a default value – tracks it with Added state.
DbSet<TEntity>.Add()– start tracking in Added state.
DbSet<TEntity>.Update()– start tracking in Modified state.
DbSet<TEntity>.Remove()/RemoveRange()– start tracking in Deleted state.
Context.Entry(object)retrieves tracked EF entry type EntityEntry for the given object. You can set .State property to change tracked state. When changing state this way you isolate the given entity and only the state of the involved entity is marked – entity is not scanned for other navigational properties and their state.
During debugging, you can see how many entities are tracked as changed. While in scope of context, you can watch _context.ChangeTracker.Entries().ToList()
Check for more details about debugging trackings in section “Update (single and batch)“.
Connected vs. Disconnected Scenario
When updating using a connected scenario, DbContext is aware which properties you changed and resulting SQL updates only those columns.
When updating using a disconnected scenario, DbContext updates all columns.
Transaction
using (var transaction = MyContext.Database.BeginTransaction())
{
    try
    {
        // ... do stuff
        MyContext.SaveChanges();
        // ... do some more stuff
        MyContext.SaveChanges();
        transaction.Commit();
    }
    catch (Exception ex)
    {
        transaction.Rollback();
    }
}
Linq
// The Three Parts of a LINQ Query:// 1. Data source.var students = context.Students;// 2. Query creation.
// Query is stored in the query variable studentsQuery.
// studentsQuery is an IEnumerable<Student>var studentsQuery =from student in students
where(students.Age >10)select student;// 3. Query execution.foreach(var student in studentsQuery){
Console.WriteLine(students.Name);}
Ordering
.OrderBy()
.OrderByDescending()
Paging
.Skip()
.Take()
You can materialize by doing .FirstOrDefault() or .ToList()
Grouping
When grouping and ordering with Linq query syntax, you must specify a temporary variable and use it with an into keyword.
Grouping does not work quite the same as in SQL: it merely orders the list according to the groupby criteria
// Group students by the first letter of their last name// Query variable is an IEnumerable<IGrouping<char, Student>>var studentQuery2 =from student in students
group student by student.Last[0]into g
orderby g.Key
select g;
// Now create groups and sort the groups. The query first sorts the // names of all students so that they will be in alphabetical order // after they are grouped. The second orderby sorts the group keys
// in alpha order.var sortedGroups =from student in students
orderby student.Last, student.First
group student by student.Last[0]into newGroup
orderby newGroup.Key
select newGroup;